> ## Documentation Index
> Fetch the complete documentation index at: https://docs.samplehc.com/llms.txt
> Use this file to discover all available pages before exploring further.
# Quickstart
> How to develop and deploy workflows
## Creating a workflow
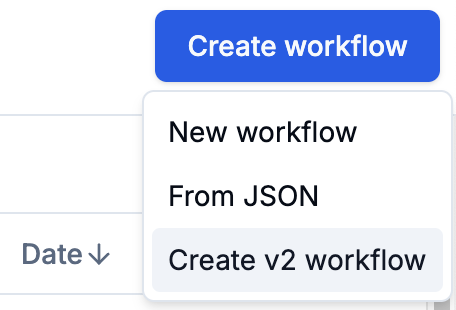
Create a new workflow by clicking **Create Workflow** > **Create v2 Workflow** in the SampleHC dashboard.
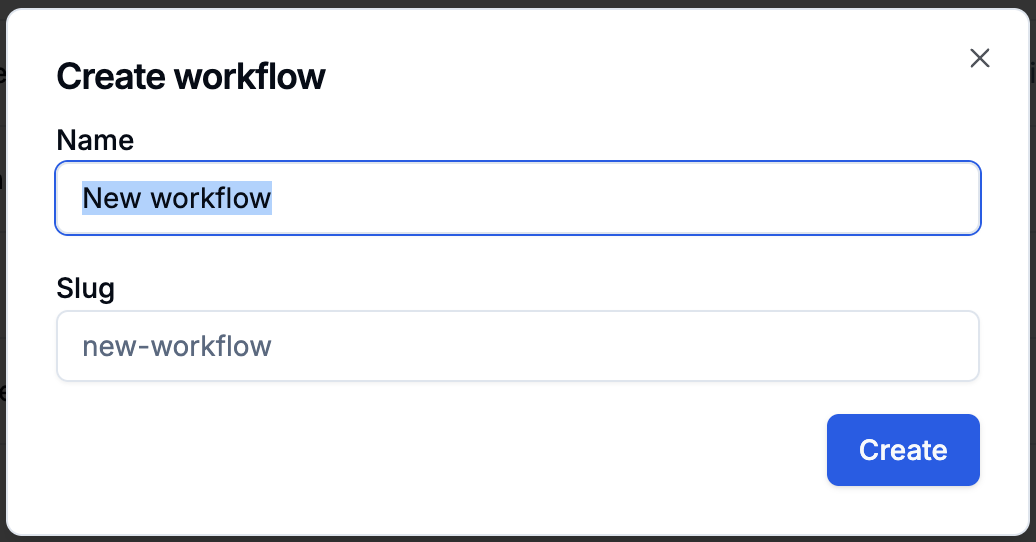
 You will be prompted to enter a name for your workflow.
Enter a name and click **Create**.
The workflow slug **must be unique** across all workflows in your organization. It will also be the name of the git repository.
You will be prompted to enter a name for your workflow.
Enter a name and click **Create**.
The workflow slug **must be unique** across all workflows in your organization. It will also be the name of the git repository.
 This will create a git repository initialized with the SampleHC workflow template.
## Developing a workflow
### Setting up the environment
First, clone the repository to your local machine.
```bash theme={null}
git clone https://git.samplehc.com//
```
**Prerequisites**: You will need to have [Node.js](https://nodejs.org/) and [Python](https://www.python.org/) installed on your machine. The versions used at the time of writing is Node.js 20.x, and Python 3.12.x, but newer versions may work as well.
At the root of your workflow, run the following commands to install dependencies
```bash theme={null}
# Install node.js dependencies
npm install
# Sets up a python virtual environment and installs python dependencies
npm run setup-python-dev
```
### Testing with Dev Mode
Depending on which environment you created your workflow, you can test your workflow by starting a dev server.
If you are not planning on making any changes to the Sample platform, the recommended way is to use `app.samplehc.com` to test your changes.
#### 1. Start the dev server
First, start your dev server by running the following command at the root of your workflow:
```bash theme={null}
npm run dev:prod
```
#### 2. Set up ngrok to forward requests to your dev server
For the SampleHC application to access your dev server, you will need to set up `ngrok` to forward requests to your dev server.
1. Follow the instructions on the [ngrok website](https://download.ngrok.com/) to install `ngrok`.
2. Run the following command to find the config location for your ngrok installation.
```bash Input theme={null}
ngrok config check
```
```bash Output theme={null}
Valid configuration file at
```
3. Copy the file [here](https://start.1password.com/open/i?a=C6URTJYED5APDNGNZNQGDSMH6E\&v=hdc6qi2mvpqhxgb6i5w43uesiu\&i=xwtrxuut5c5qvehyx2eyt2dwzm\&h=samplehealthcareinc.1password.com) to the location of your ngrok config file. Then replace `ankit` with your handle (the part before the `@` in your SampleHC email).
4. Start ngrok by running the following command. This should open two tunnels for ports 8000 and 5173, which host the Python and React (Vite) dev servers respectively.
```bash theme={null}
ngrok start --all
```
#### 3. Turn on Dev Mode on SampleHC
1. Navigate to the workflow you want to test in the SampleHC dashboard.
2. Click the Dev Mode button. If you have followed the instructions above, you should see the two tunnel URLs pre-filled in the **Dev Mode** dialog.
This will create a git repository initialized with the SampleHC workflow template.
## Developing a workflow
### Setting up the environment
First, clone the repository to your local machine.
```bash theme={null}
git clone https://git.samplehc.com//
```
**Prerequisites**: You will need to have [Node.js](https://nodejs.org/) and [Python](https://www.python.org/) installed on your machine. The versions used at the time of writing is Node.js 20.x, and Python 3.12.x, but newer versions may work as well.
At the root of your workflow, run the following commands to install dependencies
```bash theme={null}
# Install node.js dependencies
npm install
# Sets up a python virtual environment and installs python dependencies
npm run setup-python-dev
```
### Testing with Dev Mode
Depending on which environment you created your workflow, you can test your workflow by starting a dev server.
If you are not planning on making any changes to the Sample platform, the recommended way is to use `app.samplehc.com` to test your changes.
#### 1. Start the dev server
First, start your dev server by running the following command at the root of your workflow:
```bash theme={null}
npm run dev:prod
```
#### 2. Set up ngrok to forward requests to your dev server
For the SampleHC application to access your dev server, you will need to set up `ngrok` to forward requests to your dev server.
1. Follow the instructions on the [ngrok website](https://download.ngrok.com/) to install `ngrok`.
2. Run the following command to find the config location for your ngrok installation.
```bash Input theme={null}
ngrok config check
```
```bash Output theme={null}
Valid configuration file at
```
3. Copy the file [here](https://start.1password.com/open/i?a=C6URTJYED5APDNGNZNQGDSMH6E\&v=hdc6qi2mvpqhxgb6i5w43uesiu\&i=xwtrxuut5c5qvehyx2eyt2dwzm\&h=samplehealthcareinc.1password.com) to the location of your ngrok config file. Then replace `ankit` with your handle (the part before the `@` in your SampleHC email).
4. Start ngrok by running the following command. This should open two tunnels for ports 8000 and 5173, which host the Python and React (Vite) dev servers respectively.
```bash theme={null}
ngrok start --all
```
#### 3. Turn on Dev Mode on SampleHC
1. Navigate to the workflow you want to test in the SampleHC dashboard.
2. Click the Dev Mode button. If you have followed the instructions above, you should see the two tunnel URLs pre-filled in the **Dev Mode** dialog.
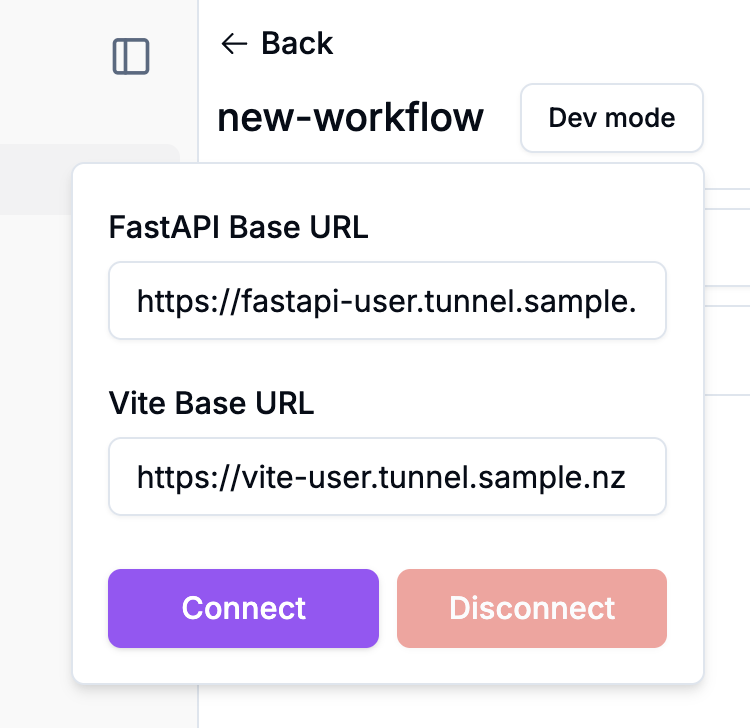 3. Click **Connect**. Both the Dev Mode toggle and the Start Workflow button (at the top right) should now be purple, indicating that you are in dev mode.
4. You can now test your workflow by clicking the Start Workflow button.
When you make changes and click save, the dev server will automatically restart and you can see the changes reflected in the SampleHC application.
#### 1. Start the dev server
Assuming that you already have the SampleHC API running on `localhost:3005`, you can start the dev server by running the following command:
```bash theme={null}
npm run dev
```
This should setup a React (Vite) dev server running on `localhost:5173` and a Python dev server running on `localhost:8000`.
#### 2. Turn on Dev Mode on SampleHC
1. Navigate to the workflow you want to test in the SampleHC dashboard.
2. Click the Dev Mode button. The dialog should be pre-filled with the localhost URLs for the Python and React dev servers.
3. Click **Connect**. Both the Dev Mode toggle and the Start Workflow button (at the top right) should now be purple, indicating that you are in dev mode.
4. You can now test your workflow by clicking the Start Workflow button.
When you make changes and click save, the dev server will automatically restart and you can see the changes reflected in the SampleHC application.
## Dashboard Development
To develop and test dashboards locally, you can run the dashboard in dev mode using the following steps:
### 1. Install dependencies
First, install the Node.js dependencies:
```bash theme={null}
npm install
```
### 2. Start the dev server
Start the dashboard dev server:
```bash theme={null}
npm run dev:prod
```
### 3. Set up ngrok for external access
To make your local dashboard accessible externally, use ngrok to create a tunnel (Node.js part only):
```bash theme={null}
ngrok start --all
```
This will create the necessary tunnels for the dashboard to be accessible from external services while running in development mode.
### Deploying a workflow
To deploy your workflow, you can push your changes to the `main` branch of the git repository.
```bash theme={null}
git push origin main
# or simply `git push` if you are already in the main branch
```
This will trigger a build and deploy of your workflow.
3. Click **Connect**. Both the Dev Mode toggle and the Start Workflow button (at the top right) should now be purple, indicating that you are in dev mode.
4. You can now test your workflow by clicking the Start Workflow button.
When you make changes and click save, the dev server will automatically restart and you can see the changes reflected in the SampleHC application.
#### 1. Start the dev server
Assuming that you already have the SampleHC API running on `localhost:3005`, you can start the dev server by running the following command:
```bash theme={null}
npm run dev
```
This should setup a React (Vite) dev server running on `localhost:5173` and a Python dev server running on `localhost:8000`.
#### 2. Turn on Dev Mode on SampleHC
1. Navigate to the workflow you want to test in the SampleHC dashboard.
2. Click the Dev Mode button. The dialog should be pre-filled with the localhost URLs for the Python and React dev servers.
3. Click **Connect**. Both the Dev Mode toggle and the Start Workflow button (at the top right) should now be purple, indicating that you are in dev mode.
4. You can now test your workflow by clicking the Start Workflow button.
When you make changes and click save, the dev server will automatically restart and you can see the changes reflected in the SampleHC application.
## Dashboard Development
To develop and test dashboards locally, you can run the dashboard in dev mode using the following steps:
### 1. Install dependencies
First, install the Node.js dependencies:
```bash theme={null}
npm install
```
### 2. Start the dev server
Start the dashboard dev server:
```bash theme={null}
npm run dev:prod
```
### 3. Set up ngrok for external access
To make your local dashboard accessible externally, use ngrok to create a tunnel (Node.js part only):
```bash theme={null}
ngrok start --all
```
This will create the necessary tunnels for the dashboard to be accessible from external services while running in development mode.
### Deploying a workflow
To deploy your workflow, you can push your changes to the `main` branch of the git repository.
```bash theme={null}
git push origin main
# or simply `git push` if you are already in the main branch
```
This will trigger a build and deploy of your workflow.